Part of the migration to IPv6 is managing a way for IPv6 only clients to connect to IPv4 only servers. As the RIR’s have run out of IPv4 address space to give to the LIR’s we will start to see more ISP’s which have to take up one of several solutions whether that be CGNAT using the 10.64.0.0/10 prefix and dual stack, or perhaps just getting rid of IPv4 only at the customer side and using NAT64 to convert native IPv6 clients onto the IPv4 Internet.
While dual stacking can be done, it is a lot more work to double configure your entire network and it may make more sense for some people to just build new networks as native IPv6 only and forego the duplicate address planning and all the extra work such as ensuring that firewall rules account for two protocols etc.
NAT64
But how do we connect to an IPv4 only server when we are IPv6 only? Much of the Internet is still only on IPv4. The answer is we use NAT64 to map the entire 32 bit IPv4 address space into a single IPv6 /96 prefix.
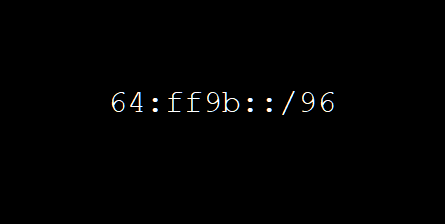
This prefix can operate in one of two ways, it can be a part of the global IPv6 address space where a network or an ISP dedicates a /96 of their own global address space which is used by the NAT64 server, or it can be the reserved NAT64 address space 64:ff9b::/96 as defined in RFC6502
Pinging 8.8.8.8 from an IPv4 client is as follows:
ping 8.8.8.8

Pinging 8.8.8.8 with 32 bytes of data:
Reply from 8.8.8.8: bytes=32 time=11ms TTL=116
Reply from 8.8.8.8: bytes=32 time=20ms TTL=116
Reply from 8.8.8.8: bytes=32 time=24ms TTL=116
Reply from 8.8.8.8: bytes=32 time=16ms TTL=116
Pinging the same IPv4 server but via a NAT64 server from an IPv6 client is as follows:
ping 64:ff9b::0808:0808

Pinging 64:ff9b::808:808 with 32 bytes of data:
Reply from 64:ff9b::808:808: time=29ms
Reply from 64:ff9b::808:808: time=27ms
Reply from 64:ff9b::808:808: time=21ms
Reply from 64:ff9b::808:808: time=26ms
You can clearly see how the address 8.8.8.8 maps nicely into the bottom of the IPv6 prefix as 808:808, in fact you can even use decimal notation within the NAT64 address with dots.
ping 64:ff9b::8.8.8.8DNS64
That’s all well and nice, but the world doesn’t work on just IP addresses, the majority of users will use a domain name to reach a resource. Those domain names have to be configured with A records or AAAA records to resolve IPv4 or IPv6 addresses respectively.
But what if the domain name doesn’t have an AAAA record and only returns an IPv4 address with an A record? This is where some magic happens with DNS64 to auto generate the missing AAAA record into the DNS lookup responses. This is just like a normal DNS resolver but is usually hosted on an alternative IP address or server, and is supposed to only be bound to IPv6 addresses.
When users type a web address into their browser, all that happens is DNS resolves that name to an IPv4 and/or and IPv6 address. When the result doesn’t have an AAAA record the 32 bit IPv4 address is mapped into the /96 prefix and returned to the user which directs them to their NAT64 server.
If the client has native IPv6 and an AAAA record is returned then a native IPv6 connection is made to the server. If the AAAA record is missing the client still tries to connect over IPv6 using the auto generated AAAA record.
Twitter or x.com (uhg) is famous for being one of the last companies to still not have native IPv6 at the time of writing. When you query a normal DNS resolver the follow A records are presented to you.
Non-authoritative answer:
Name:    twitter.com
Address:  104.244.42.129
          104.244.42.193
          104.244.42.65
          104.244.42.1
Aliases:  www.twitter.com
If you resolve twitter.com against a DNS64 server then the response is quite different. This specific DNS64 server has been instructed to remap A records into the 64:ff9b::/96 prefix. Other public DNS64/NAT64 servers may resolve to an alternative NAT64 prefix.
Non-authoritative answer:
Name:    twitter.com
Addresses:  64:ff9b::68f4:2ac1
          64:ff9b::68f4:2a41
          64:ff9b::68f4:2a01
          64:ff9b::68f4:2a81
          104.244.42.193
          104.244.42.65
          104.244.42.1
          104.244.42.129
Aliases:  www.twitter.com
Easy Option
Use someone else’s public DNS64 server and you’ll be automatically directed to their NAT64 server. An example of this is nat64.net which can be enabled just by using their DNS resolvers on your computer. If you resolve twitter against their server you’ll get mapped to a public address space used by their NAT64 server. Your computer will connect to their IPv6 address over the Internet and then be connected to twitter by their IPv4 Internet.
Non-authoritative answer:
Name:    twitter.com
Addresses:  2a00:1098:2c::5:68f4:2ac1
          2a01:4f8:c2c:123f:64:5:68f4:2ac1
          2a00:1098:2b::1:68f4:2ac1
In this case NAT64 are directing you to a number of public IPv6 address spaces: 2a00:1098:2c::5/96, 2a01:4f8:c2c:123f:64:5/96 or 2a00:1098:2b::1/96. In all responses the last 32 bits are 68f4:2ac1 which if converted back to IPv4 is an expected IPv4 address for twitter.com’s A record.
The negative of public servers is you have to trust who you use, as with anything that tunnels traffic they’ll be steering your traffic and be able to sniff it. Their servers are likely rate limited or capped in some way to prevent abuse or excess usage. Finally they maybe located far away and drastically increase ping times.
Better Option
If you want control over your traffic you can roll your own NAT64 server, and potentially DNS64 servers too.
Google’s public DNS and Cloudflares public DNS offer alternative public NAT64 servers which resolve auto generated AAAA records into the 64:ff9b::/96 prefix. You can use these servers in place of 8.8.8.8 or 1.1.1.1 and you’ll just need a NAT64 server on your network which the prefix 64:ff9b::/96 is routed to.
The full control option is to spin up a BIND or Unbound resolver on your own network and enable DNS64 on that server instead.
Install & Configure Tayga
Before installing your server, also consider where on your network you are placing it, and what restrictions you’ll be placing on it such as firewall rules to ensure its not publicly accessible. In theory anyone on the IPv6 Internet can route through your server and make all sorts of nefarious connections from your IPv4 address if you do not properly secure your server.
Step 1) Install Tayga
sudo apt update
sudo apt install tayga
Step 2) Enable IP forwarding to allow your host to act as a router
sudo sysctl -w net.ipv4.ip_forward=1
sudo sysctl -w net.ipv6.conf.all.forwarding=1
For this to be persistent across reboots edit the file vim /etc/sysctl.conf and uncomment the lines with the same parameters.
sudo vim /etc/sysctl.confAdd or uncomment:
net.ipv4.ip_forward=1
net.ipv6.conf.all.forwarding=1
Step 3) Configure Tayga
sudo vim /etc/tayga.confReplace the contents of the file as follows, updated ipv6-addr to be your servers IPv6 address.
tun-device nat64
ipv4-addr 192.168.255.1
ipv6-addr 2001:db8:1000::64
prefix 64:ff9b::/96
dynamic-pool 192.168.255.0/24
data-dir /var/spool/tayga
Step 4) Enable and Restart Tayga
sudo systemctl restart tayga
sudo systemctl enable tayga
Step 5) Update IP Tables
sudo iptables -t nat -A POSTROUTING -o nat64 -j MASQUERADE
sudo iptables -t nat -A POSTROUTING -s 192.168.255.0/24 -j MASQUERADE
To make IP tables persistent after a reboot, use iptables-save
sudo apt-get install iptables-persistent
sudo iptables-save | sudo tee /etc/iptables/rules.v4
sudo ip6tables-save | sudo tee /etc/iptables/rules.v6
Step 6) Setup Routing
Ensure your routing table has an entry for 64:ff9b::/96 with the next hop as your Tayga server, in this demo case 2001:db8:1000::64.
Step 7) Test Ping
ping 64:ff9b::8.8.8.8

Pinging 64:ff9b::808:808 with 32 bytes of data:
Reply from 64:ff9b::808:808: time=27ms
Reply from 64:ff9b::808:808: time=29ms
Reply from 64:ff9b::808:808: time=26ms
Reply from 64:ff9b::808:808: time=26ms
You are now able to use your own NAT64 server provided you use a public DNS64 service such as Google DNS64. If you’d like more control you can now setup your own local DNS Server.
Install & Configure BIND as DNS64 Server
In this configuration we will setup bind to listen on multiple IP addresses where it will respond as a normal resolver on IPv4 of IPv6 2001:db8:1000::d, but as a DNS64 resolver when queries arrive on 2001:db8:1000::d64. We will achieve this using views. If you just want a DNS64 server you can forego the views section of the configuration file and just add the required dns64 section into your normal options { } section.
Step 1) Install BIND
sudo apt update
sudo apt install bind9
Step 2) Configure BIND
To do this we modify the options file:
sudo vim /etc/bind/named.conf.optionsHere is a template to work from:
sudo vim /etc/bind/named.conf.options

options {
        listen-on-v6 { any; };
};


view "resolver" {
        match-destinations { 192.168.100.53; 2001:db8:1000::d; };

        allow-recursion { any; };
        recursion yes;

        include "/etc/bind/named.conf.default-zones";

};

view "resolver64" {
        match-destinations { 2001:db8:1000::d64; };

        allow-recursion { dns64-client-ranges; };
        recursion yes;

        dns64 64:ff9b::/96 {
                clients { dns64-client-ranges; };
                mapped { !rfc1918; any; };
                exclude { 64:ff9b::/96; ::ffff:0000:0000/96; };
                suffix ::;
        };

        include "/etc/bind/named.conf.default-zones";
};

acl "dns64-client-ranges" {
        2001:db8::/32;
};

acl rfc1918 {
        10.0.0.0/8;
        192.168.0.0/16;
        172.16.0.0/12;
};
Step 3) Enable and Restart BIND
sudo systemctl enable named
sudo systemctl restart named
Step 4) Test Query
Test query against your DNS64 and DNS resolver addresses:
nslookup www.twitter.com 2001:db8:1000::d

Non-authoritative answer:
Name:    twitter.com
Address:  104.244.42.1
Aliases:  www.twitter.com


nslookup www.twitter.com 2001:db8:1000::d64

Non-authoritative answer:
Name:    twitter.com
Addresses:  64:ff9b::68f4:2a81
          104.244.42.129
Aliases:  www.twitter.com
Step 5) Set Your Computers DNS Server
Now that you’ve tested your resolver, set your computers DNS servers to your new DNS64 server and try pinging an IPv4 only site like twitter.
ping -6 www.twitter.com

Pinging 64:ff9b::68f4:2a81 with 32 bytes of data:
Reply from 64:ff9b::68f4:2a81: time=26ms
Reply from 64:ff9b::68f4:2a81: time=19ms
Reply from 64:ff9b::68f4:2a81: time=21ms
Reply from 64:ff9b::68f4:2a81: time=24ms
If the ping works you’re all good, in fact for fun you could even turn off IPv4 protocol on your machine and see how much stuff now works on IPv6 only.
Not everything will work, protocols which have always been sensitive to NAT will still have issues, such as SIP or IPSEC. As well as any protocols which specifically list IPv4 hosts inside their application layer rather than DNS names.


